Learn to Loom Knit a Swirl Beanie
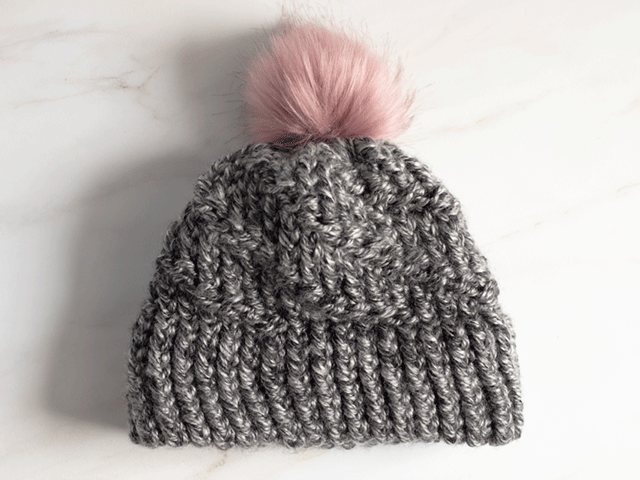
What’s up, my knitters? We’ve covered the E-wrap stitch with my Tiny Hearts Beanie. It’s time to expand our stitch library with the Purl stitch. This Swirl Beanie is the perfect way to learn the new stitch while creating a fun new texture.
As with the Tiny Hearts Beanie and the Fair Isle Beanie, this Swirl Beanie features a double brim to ensure a snug, warm fit. No need to worry about the ends of your hat curling and ruining your cute aesthetic.
If you get into the groove, you can finish this beanie in an hour or two – though, of course, you don’t have to go so quickly if you don’t want to.
A Quick Guide to Materials
To make this Swirl Beanie, I picked my 9-inch 36-peg round loom (pink). It came with this loom set from Amazon.* This loom is the perfect size for the average adult female head. However, I made my hat a little bit smaller this time specifically for my daughter.
*As an Amazon Associate, I do receive a commission for recommending products. However, I’m not paid to upsell specific brands. I link to products I use and enjoy regularly, but don’t panic if you don’t have my exact same loom. My Swirl Beanie pattern is flexible and easy to adjust to almost any other loom size.
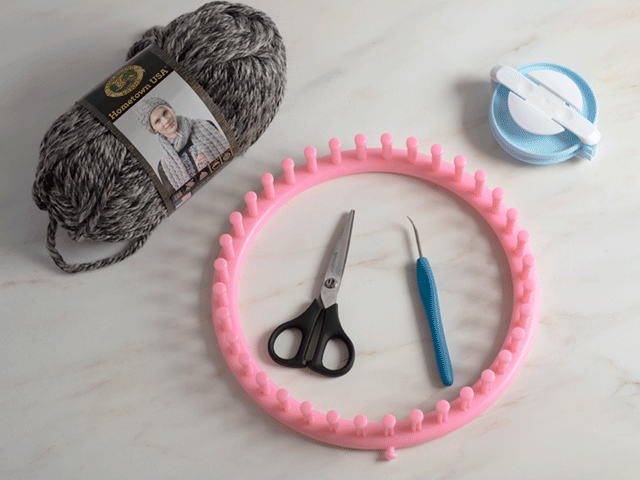
My pink loom has a large gauge so it needs a thicker, chunkier yarn. If want to recreate the beanie exactly as it is shown in the photos, you’ll want to have a skein of bulky size 6 Lion Brand Hometown yarn. If you use smaller-sized yarn, your hat will look loose, and the swirl design may get lost.
As you prepare your materials, remember to grab a scissors, a yarn needle, and a loom hook. Pompoms are optional, but I especially liked the look of these faux fur pompoms with this particular hat design.
Keep in mind that this is ultimately your hat. You can pick and choose your yarn colors and whether or not to add decorations. I want you to have fun as you learn to loom knit.
How to Cast On with the E-Wrap
To loom knit a Swirl Beanie, you need to understand two stitches: the e-wrap and the purl. The double brim will use the e-wrap, and then you’ll alternate the e-wrap with the purl stitches to make a swirl.
Let’s start!
First, tie a slip knot around a marked peg of your loom. My loom has an extra peg on the side to help me keep things straight, but you can start anywhere so long as you know exactly which peg is your first one.
Next, wrap the yarn around the adjacent peg. Your loop should stay on the outside of the loom while the rest of the yarn stays in the inside. As a note: you can go to the left or to the right when loom knitting this Swirl Beanie – though you do need to stay consistent. I like to work to the left, so that’s what’s pictured.
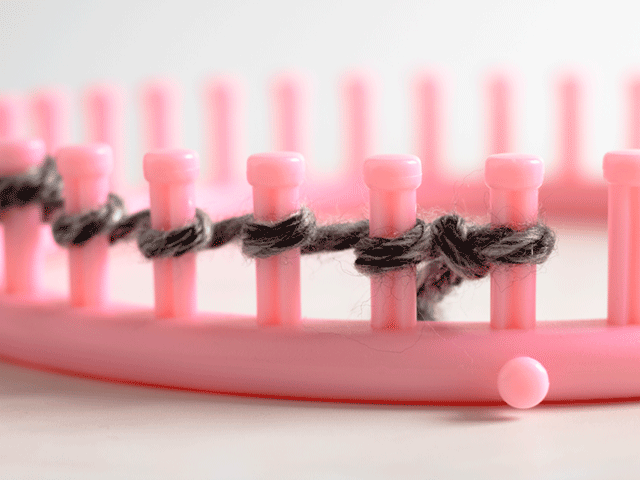
Work your way around the entire loom, wrapping each peg once. Next, repeat! Wrap your way around the loom. Each peg should have two loops.
When you’re done, wrap your yarn around your side peg (if you have one) to hold it in place. If your loom doesn’t have the side peg, just hold the yarn off to the side in such a way that it stays secure for you.
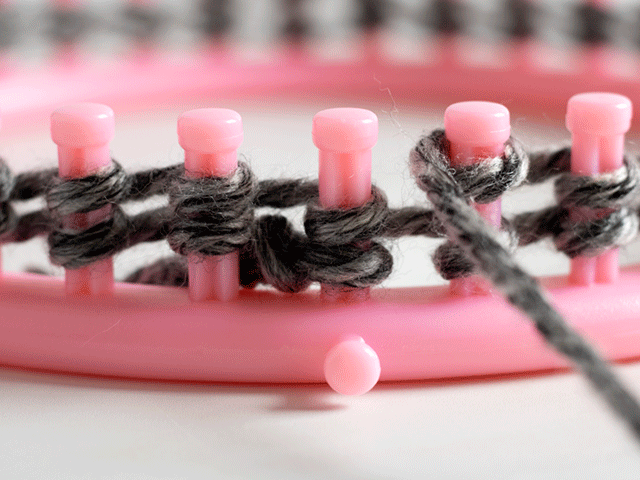
Next, you’ll need your loom knitting hook. Slide the hook under the bottom loop on your starting peg.
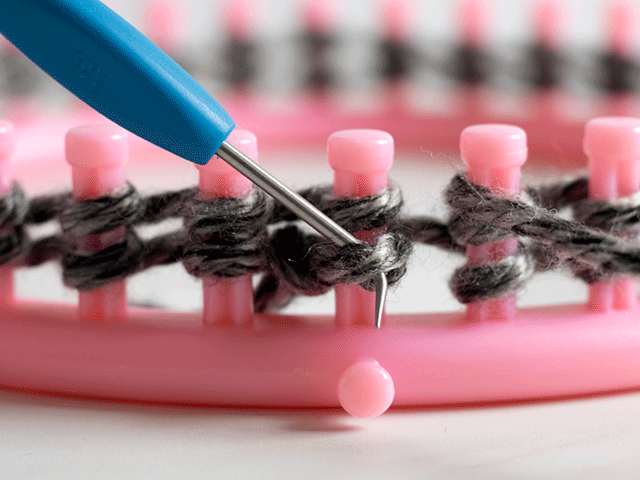
Pull it gently up and over the peg. Don’t pull too hard or your slip knot may loosen or untie completely.
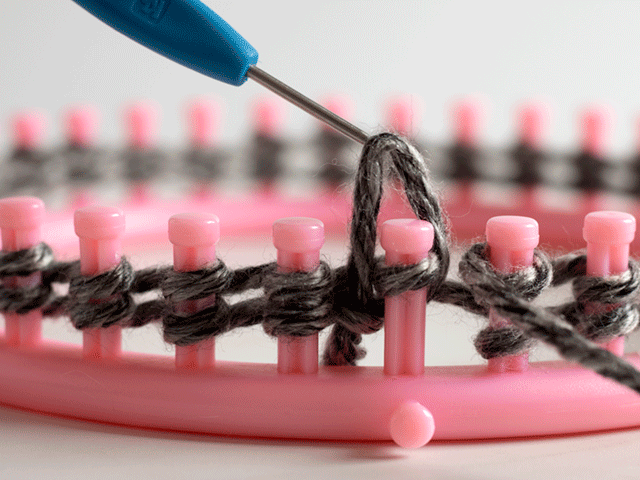
Let the yarn fall behind the peg. And repeat! Move to the next peg, pull the bottom loop over the top one, and go around the entire loom that way until each peg only has one loop.
How to Loom Knit a Double Brim
For this Swirl Beanie, we’re making a double brim. I like the double brim for a variety of reasons. First, it’s easy to do and easy to adjust the number of rows for a better fit. Second, it prevents curling. You don’t have to worry about your hat flipping up and ruining your look. And third, it makes the overall hat take on a nice traditional bell-shape which I think is pretty cute.
To make a double brim, you use the same technique you followed for the first row. Wrap each peg around the loom. Pull the bottom loop over the new top loop, and repeat. As you knit, count each row. As a general rule, double brims need about 15 to 20 rows. I prefer the full 20 when making a hat for myself, but my daughter has a smaller head than me and I only needed about 15 for her.
You can choose to knit fewer or more rows for your hat. Just keep in mind that you’ll need to fold it in half when you’re done.
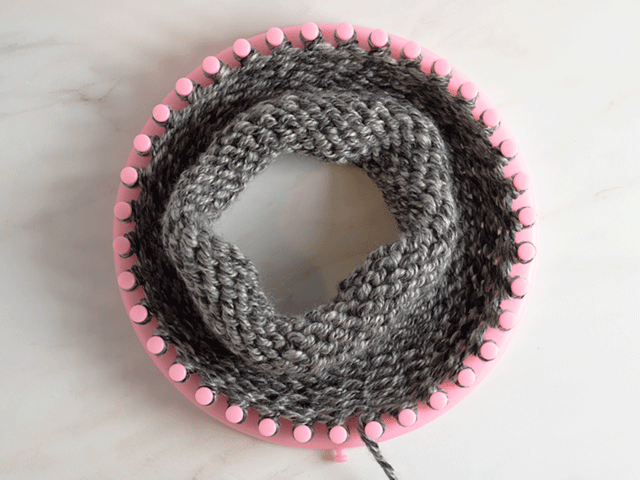
To make the brim, grab the bottom of your knitting from inside your loom. Locate your original slip knot. Pull the loop next to your slip knot over your marked peg. Next, slide the neighboring loop over the adjacent peg. Continue with each loop until you have a loop on every peg.
Double check that your working yarn is still next to your marked peg. You don’t want to accidentally fold your working yarn in the wrong place.
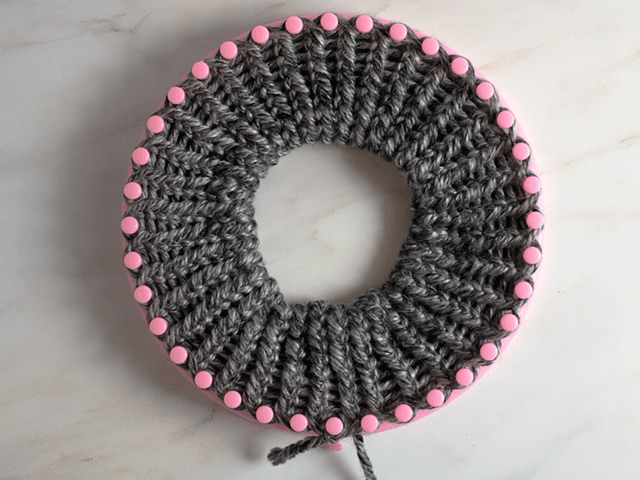
Now that every peg has two loops (your latest knitted row on the bottom and your very first row on the top), grab your knitting hook and slide it under the bottom loop.
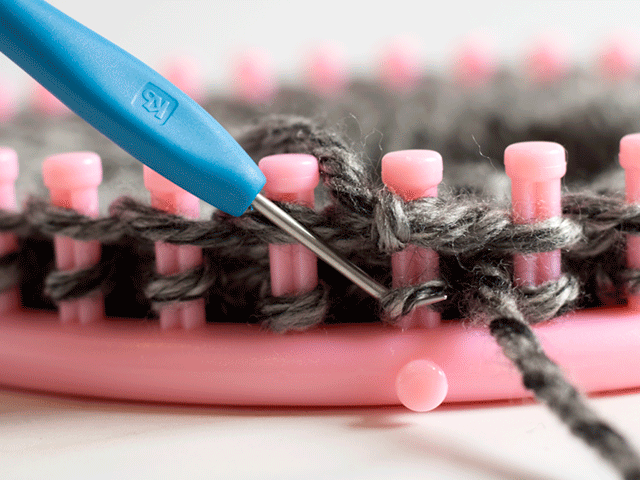
Just like before, pull the bottom loop up and over the peg, letting the yarn fall behind the peg.
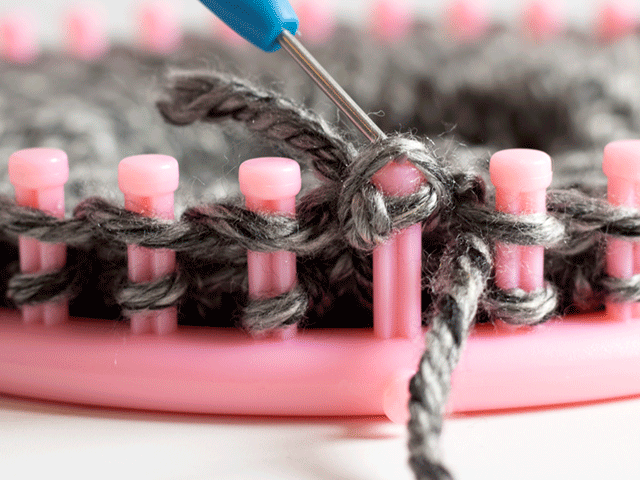
Repeat with the neighboring loop again and again until you’ve gone around the entire loom.
Congratulations! You’ve just finished your double brim.
How to Knit the Purl Stitch
Now that you’ve mastered the e-wrap stitch, it’s time to tackle the purl stitch. The purl stitch is the inverse of the e-wrap. If you were to knit your hat entirely out of e-wrap stitches and then flip it inside out, you’d see a bunch of purl stitches.
But we don’t want a hat entirely out of backward e-wrap stitches. We want a few scattered purl stitches to create the signature swirl pattern of this hat. To do that, you’ll need to place your working yarn in front and underneath the loop on your starting peg.
Do not put your working yarn above the loop (like you would with the e-wrap) otherwise you’ll going to make a knit stitch.
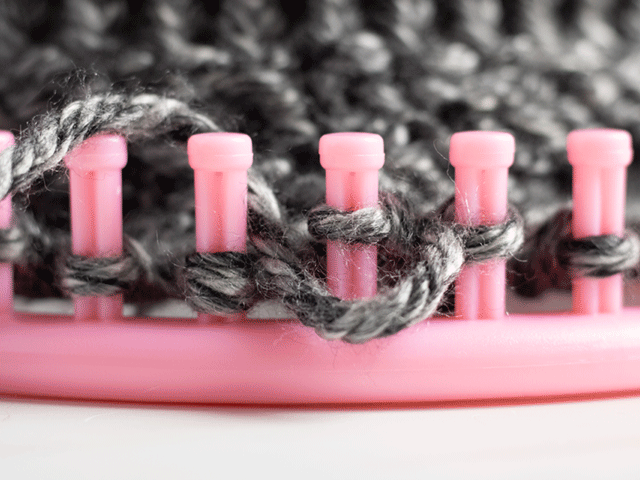
Next, slide your loom hook into the top loop. This next bit can be a bit tricky, but use your hook to grab your working yarn and pull it up and through the front of your top loop.
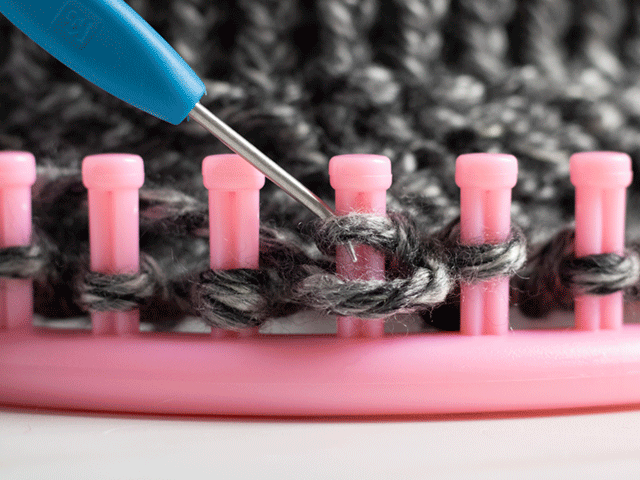
When you have a nice loop, lift it up so your old loop (previously the top loop) falls off the peg. Place the new loop onto the peg. Pull gently on your working yarn to tighten your loop onto the peg as needed.
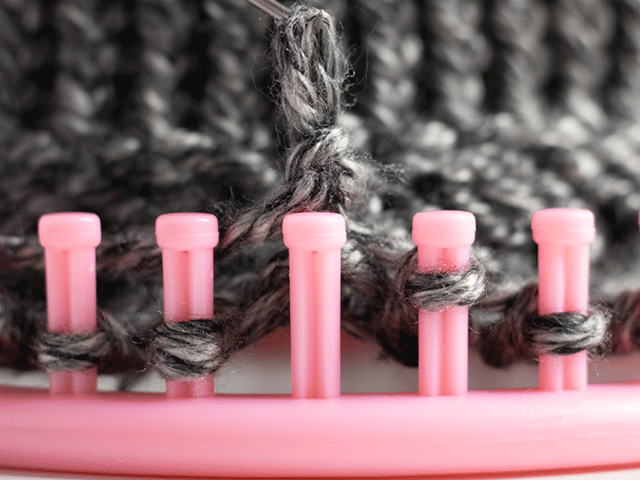
Just like the e-wrap, you want your purl stitch to be tight enough on the peg that it stays put, but not so tight that you can’t pull it up and over the peg later. Tension can be difficult to get right at first, but with practice, it should start to come naturally.
Follow the Swirl Beanie Pattern
Now that you understand both the e-wrap and the purl stitches, it’s time to start alternating between the two to create a swirl pattern. In a nutshell, you’ll need to e-wrap four stitches and then purl two stitches, then shift that pattern on each row.
To help you visualize the technique, I made this free swirl beanie knitting pattern for you to follow. The numbers going up on the right hand side represent the total number of rows you’ll be knitting. The numbers going from right to left represent the number of pegs on the loom. It does not include the rows we made for the double brim.
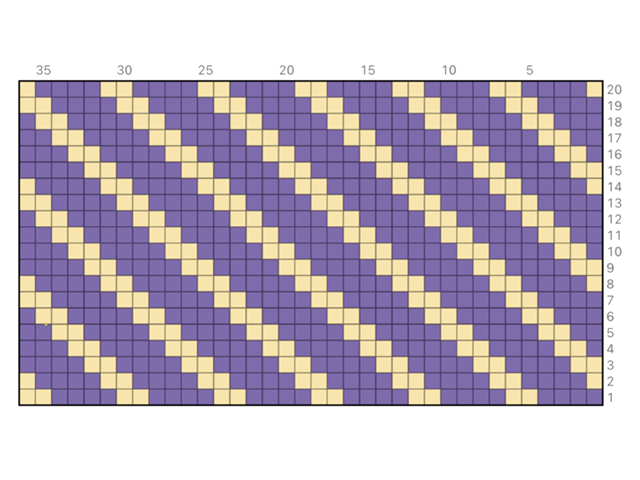
Can’t see the image? Here’s a breakdown of what you’ll need to do for each row:
- Row 1: E-wrap 4 stitches and purl 2 stitches. Repeat 6 times.
- Row 2: Purl 1 stitch, e-wrap 4 stitches, and purl 2 stitches. E-wrap 4 and purl 2 repeated 5 times (almost 6 times with the last purl stitch missing).
- Row 3: Purl 2 stitches, e-wrap 4 stitches, and purl 2 stitches. Repeat 5 times (Aalmost 6 times with the last two purls missing).
- Row 4: E-wrap 1 stitch and purl 2 stitches. E-wrap 4 stitches and purl 2 stitches. Repeat 5 times, then e-wrap the last 3 stitches.
- Row 5: E-wrap 2 stitches and purl 2 stitches. E-wrap 4 stitches and purl 2 stitches. Repeat 5 times, e-wrap the last 2 stitches.
- Row 6: E-wrap 3 stitches and purl 2 stitches. E-wrap 4 stitches and purl 2 stitches. Repeat 5 times, e-wrap the last stitch.
- Row 7: Repeat row 1
- Row 8: Repeat row 2
- Row 9: Repeat row 3
- Row 10: Repeat row 4
- Row 11: Repeat row 5
- Row 12: Repeat row 6
I hope this pattern makes sense. If you struggle to follow it, please let me know in the comments below or reach out to me through my contact page. I’ll be happy to help you troubleshoot.
How to Cast Off the Loom
Once you have knitted and purled all the rows you want for your swirl beanie, it’s time to carefully take your hat off the loom. To do so, wrap your working yarn around your loom one and a half times, then cut it with your scissors.
Next, grab your yarn needle and thread your working yarn through it. Slide your yarn needle through the bottom of your loop on your starting peg and pull the working yarn all the way through. Continue to pull until the loop lifts up and off the peg.
Repeat with the adjacent peg, sliding through the bottom loop and pulling it off the peg. Work your way around the entire loom.
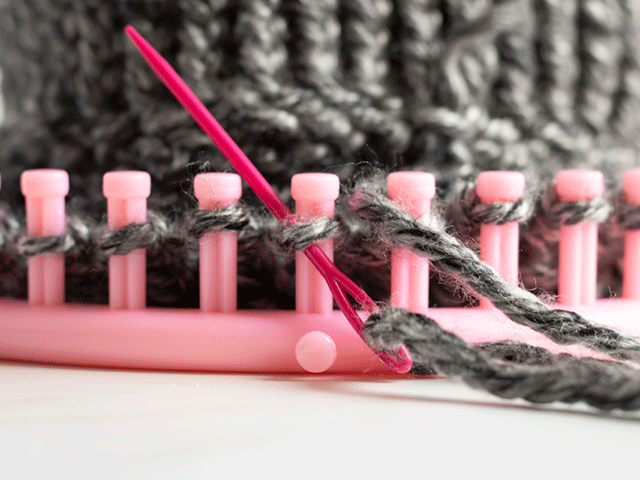
Now that your beanie is off the loom, it should look something like this. It’s okay if the swirl pattern doesn’t look as clean from this side – you’re looking at your hat inside out.
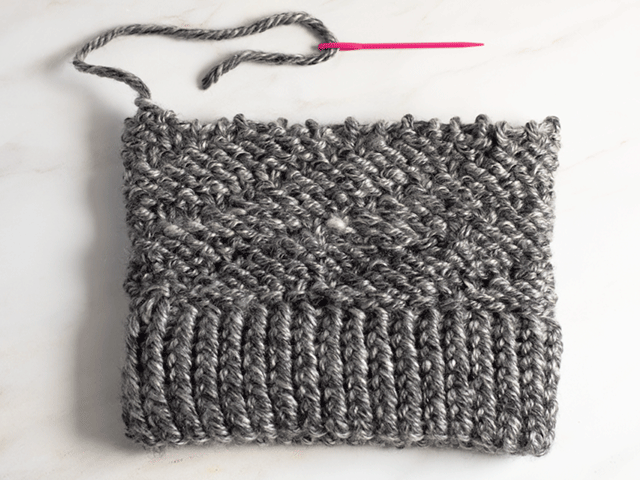
To finish your hat, pull on your working yarn until the top cinches up. Keep in mind that the top won’t close completely, even if you pull your yarn really tight. This is where your extra working yarn comes in handy.
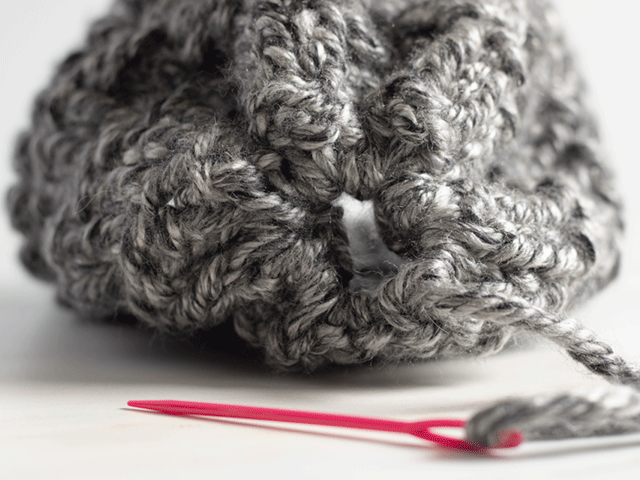
Use your yarn needle to stitch the top of the hat closed. I prefer to make a generic X shape when closing the top of my hat, but you can get creative and go around the top in a circle. Or just stitch in whatever way feels best to you. It’s okay if the top looks a little messy – we’re going to cover it up with a pompom. When you’re done, knot the yarn, cut it, and tuck any loose ends into the rest of the hat.
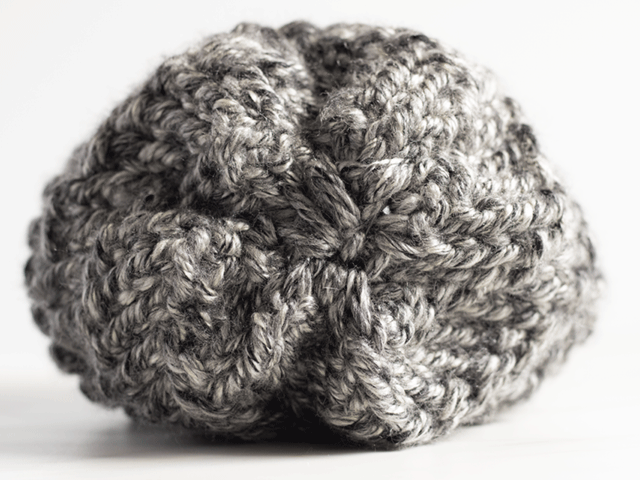
Next, turn your hat right side out and grab your faux fur pompom (or any pompom that you have available). These pompoms have little loops in them, so I cut a piece of extra yarn and pull it through the loop. I thread the yarn through my yarn needle and then attach pull the ends through the top of the hand. A quick knot, a trim, and a tuck is all you need to get the pompom to stay on your hat.

And you’re done! At this point you can stitch on a button or rivet on a tag. Feel free to add any flair you want to your finished Swirl Beanie.
Need Some Extra Help?
I’m still a beginner loom knitter myself, so I try to stick to patterns that I can do easily and explain simply. However, just because my tutorial makes sense to me, doesn’t mean it makes sense to you. If you struggle with your Swirl Beanie, please reach out to me through my contact me page, and I’ll be happy to troubleshoot.
If you enjoyed this tutorial, please remember to bookmark, like, or share this tutorial with others. You can also tag me @late_loomer on Instagram if you want to show off your finished hat. Do you have tips or pointers for making this hat better? Please share your ideas in the comment section below.
