
Learn to Loom Knit a Fair Isle Beanie
If you love sweaters, you may have heard the term “Fair Isle” tossed around from time to time. The Fair Isle pattern is a popular knitting tradition originating in the Shetland islands. It displays complex geometric patterns, and many Fair Isle items of clothing feature multiple colors, albeit in a limited palette. As a general rule, Fair Isle patterns use no more than two colors in a row, worked on a round.
Over the last few years, however, many knitters have simplified Fair Isle patterns to mean projects with repeating color work. Many Fair Isle scarves, hats, and sweaters use only a basic e-wrap stitch, making them a good choice for beginners.
If you want to join in on this fun tradition, I’ve got the perfect Fair Isle Beanie pattern for you to try today. Just check it out!
A Quick Guide to Materials
For this Fair Isle Beanie, I chose my pink round loom. It was part of a loom set from Amazon* that I bought for about $20. This loom measures 9 inches in diameter and has 36 pegs – a great size for the average adult female head. Don’t have this particular loom? Don’t panic – I made this pattern flexible and versatile. It doesn’t take much tweaking to follow my tutorial with a smaller or larger loom.
The looms in this set have a bigger gauge than most, so they need a chunky yarn. If you’re following my pattern exactly as pictured, you’ll need to use two colored skeins of Lion Brand Hometown yarn, a bulky size 6. Thinner yarns will make a hat that’s loose and airy rather than warm and snug.
Once you have your loom and yarn, don’t forget to grab a loom hook, yarn needle, and scissors. Pompoms are optional. I personally prefer to make my own, and I’ve included a tutorial to make one at the end. Buttons and tags add flair, but you can add them when you’re done if you feel inclined.
*Note that I am an Amazon Associate and receive a commission for recommending products. You don’t have to buy these specific items – they’re just ones I personally enjoy using. By all means, work with what you have available.
How to Cast On with the E-Wrap
My Fair Isle Beanie only uses one stitch: the e-wrap, which looks like a lowercase e on the loom. It’s a good choice for beginnings loom knitters because it’s easy to remember and easy to repeat, so you can focus on your color work and not on your stitching.
To cast on your loom, tie a slip knot around your starting peg. My loom has a marker on the side to help me remember, but if yours doesn’t, you can designate your starting peg with a bit of permanent marker, a piece of tape, or these reusable loom markers.
Next, wrap your yarn around the adjacent peg. It doesn’t matter if you choose the right peg or the left peg, so long as the strand is on the inside of the loom and the loop is on the outside and you continue in the direction you started. I like going to my left, so my photos reflect that preference.
As you wrap, watch your yarn tension. You want your yarn tight enough that it doesn’t fall off the peg or slide up and down. However, you want it loose enough that you can easily pull the loop up and over the peg with your hook later.
When you’ve gone around the entire loom, wrap a second row above your first. Then take the end of your working yarn and wrap it around the marking peg on the side to hold it tight. If your loom doesn’t have a marking peg, you can hold the end tight while you work with your knitting hook.
Slide your hook into your first bottom loop (the one with the slip knot). Gently pull the loop up and over the peg, letting the yarn fall behind the peg.
Try not to pull too roughly or too fast, or your slip knot may become undone.
Good work! You’ve just done your first e-wrap stitch. Now all you have to do is repeat this process around the entire loom. Insert your hook into the bottom loop, pull it up and over the top of the peg, and let it fall behind the peg.
When you’ve gone around the loom, each peg should have just one loop on it, and you’ll be ready to wrap it all over again.
How to Knit the Double Brim
Many loom knitting projects involve counting rows. This Fair Isle beanie has a double brim, which requires about 15 to 20 rows of the e-wrap stitch. I like this thicker brim because it creates a snug fit, and I tend to knit at 18 rows because that suits my head shape. But don’t feel obligated to follow this exactly! If you want, feel free to knit a thinner brim with fewer rows. If you’re not sure about a size, keep in mind that you will fold the brim in half (on top of itself) later.
Now that you’ve knitted enough material for your brim, you’ll need to fold your brim in half on top of itself (making a double brim). First, locate your starting or marking peg. Use your finger to trace the row of loops all the way down to your slip-knot loop.
Reach inside your loop and grab the slip-knot loop and pull it back over your marked peg. Then, grab the adjacent loop and pull it over the next peg. Repeat with each loop until you’ve gone around the entire loom. You should have a loop on each peg – double check to make sure you haven’t missed any.
Also, please pay attention to your working yarn. It’s easy for it to get folded into your brim on accident. Keep it out so you can keep knitting with it later!
At this point, you can treat these new loops in the same way you treat your other e-wrap stitches. Insert your hook into the bottom loop.
Then pull the bottom loop up and over the top of the peg, letting the loop rest behind the peg. Repeat around the entirety of the loom.
Great work! You’ve just finished the double brim of your Fair Isle beanie. Each peg should have just one loop at this point, and your working yarn should be peeking out ready for you to knit your next row. In the above pic, I accidentally left my working yarn on the right side of the peg next to my starting peg. Oops. I had to lift that last loop so I could fix my mistake.
Time for Some Color Work
It’s time for your secondary color. I started with white as my primary color, and for this hat, I chose to alternate with red. You can pick whatever colors you want for your hat, however.
For clarity’s sake, I made a pixel graph in white and red to represent the Fair Isle pattern I made for my beanie. The numbers on the top of the graph (going horizontally) each represent a peg in my 36-peg loom. The numbers move from left to right because that’s the direction I knit on my loom. You don’t have to go in the same direction, but you should try your best to match the overall pattern.
The numbers on the right (going vertically) represent each row you’ll knit on your loom. I like the size of a beanie that’s 20 rows long because that fits my head shape best. However, I kept the pattern simple to resize. For smaller beanies, feel free to do fewer rows on top and bottom. Similarly, you can add an extra row or two for a bigger hat.
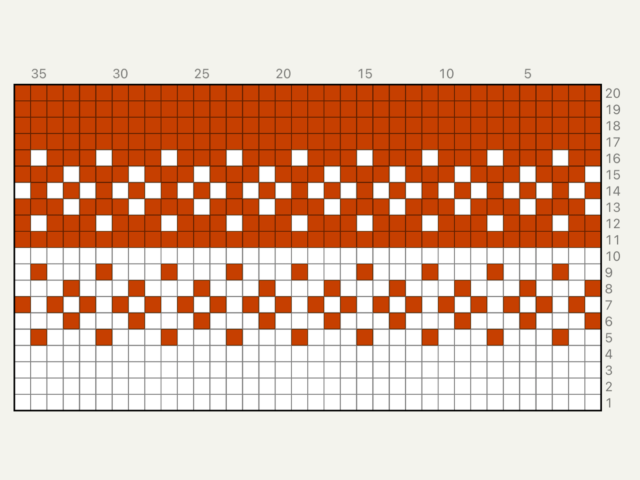
Can’t see the graph? Struggle to understand the pixel pattern? Here’s what you can do:
- Rows 1 through 4: E-wrap with primary yarn color (white).
- Row 5: E-wrap two pegs with primary (white). Cast on secondary color (red) on peg 3. E-wrap three pegs with primary (white), e-wrap one peg with secondary (red). Repeat with three pegs primary (white), one peg secondary (red) 7 times. The last peg will be your primary color (white).
- Row 6: E-wrap with secondary color (red) on first peg. E-wrap three pegs with primary color (white). Repeat 8 times. The last three pegs will be your primary color (white).
- Row 7: E-wrap with primary color (white) on first peg. E-wrap with secondary (red) on the second peg. Continue alternating every other peg with the two colors.
- Row 8: See row 6.
- Row 9: See row 5.
- Row 10: E-wrap this entire row with your primary yarn (white).
You’re halfway! If you were to pull your Fair Isle Beanie through the middle of your loom, it should look something like this.
Note that you don’t have to pull it up. I just pulled it up for the photo so you could better visualize the project as it’s coming along. Feel free to let your beanie fall naturally through the center.
When you’re ready, it’s time to flip the color pattern.
- Row 11: E-wrap the entire row with your secondary yarn (red).
- Row 12: E-wrap two pegs with your secondary yarn (red). E-wrap with your primary color (white) on peg three. E-wrap three pegs with secondary (red) followed by one peg with primary (white), repeating around the entire loom. Your last peg will be your secondary color (red).
- Row 13: E-wrap with your primary color (white) on the first peg. E-wrap with your secondary color (red) on the next three pegs. Continue wrapping one peg with primary color (white) and three pegs with secondary color (red) around the loom. The last three pegs will be your secondary color (red).
- Row 14: E-wrap with your secondary color (red) on the first peg. E-wrap your primary color (white) on the second peg. Continue alternating every other peg around the loom.
- Row 15: Same as row 13.
- Row 16: Same as row 12. Tie off and cut your primary color (white).
- Row 17 through 20: E-wrap everything with your secondary color (red).
You made it! Well done! You’ve done the hardest part of knitting your Fair Isle Beanie. If you feel like pulling your hat up through the middle of your loom, it should look like this at this point.
I know it looks messy right here, but that’s because you’re looking at your hat from the inside out. The pattern should look nice and neat if you let your beanie fall through the center and you look at it from the bottom.
Casting Off
Now that you’ve knit all the rows you need for your Fair Isle Beanie, it’s time to take it off the loom. But don’t start pull it off the pegs just yet!
First, wrap your working yarn (your secondary color – red) around your loom one and a half times. Then cut it. Grab your yarn needle and thread your working yarn through the hole. Insert the yarn needle through the bottom loop of your starting peg. Pull the yarn through and then keep pulling until the loop lifts up and over the peg.

Then move onto the adjacent peg and repeat. Insert through the bottom of the loop, pull, and lift up. Go around the entire loom this way until you’ve completely lifted your beanie off the loom. It should look something like this.
At this stage, you’ll want to knot and tuck in any loose ends from your primary yarn (white). Then, pull on your working secondary yarn (red) to cinch the top of the hat. You want to pull the yarn tight enough that it creates a nice bell shape, but not so tight that the hole closes entirely. If you try to pull too tight, you risk breaking your yarn.
To close up the hole, use the remainder of your working yarn to stitch an X in the top of the Fair Isle beanie. Don’t worry about making the top look perfect – you can cover it up with a pompom later.
When you’ve thoroughly covered the hole, tie a knot and trim any excess yarn. If you need to, tuck the ends into the rest of the hat.
Flip your hat right side out, and you’re done! Great work!
You can consider your Fair Isle beanie finished, if you want. But I think this particular hat deserves a pompom – so let’s get working on that next.
Learn to Make a Pompom
If you leave your Fair Isle Beanie as it is, the solid color from the brim can make the rest of the pattern look off balance. You need more of your secondary color to give your hat some visual weight and height to even things out.
My loom kit came with a pompom maker, so let’s use that to make a beautiful red pompom to finish our hat.
To start, open one arm of the pompom maker. Wrap the yarn around the arm until it’s completely full. You want it so full that the maker struggles to close around it. The more you wrap, the fluffier your pompom will be.
Cut the string, wrap the loose end around the arm, and close the arm. Then do the same thing with the other side: open the arm, wrap the arm, cut the string, and close.
Here we have a nicely wrapped, full pompom maker. Next you’ll need a sharp pair of craft scissors or a razor blade. Cut down the middle (horizontally against the yarn) of both sides of the pompom maker.
Next, cut a length of yarn long enough to wrap around the pompom maker and have a few inches left over on both ends. Circle the pompom maker with the yarn and tie a half knot.
Got everything lined up? Pull that half knot tight – as tight as the yarn will allow. The yarn should slide into the middle of the pompom maker. Tie a second half knot and repeat, creating a full knot that holds all those bits of yarn together.
Open the arms of the pompom maker, then pull the two halves apart. Your new pompom will pop right out. It won’t look especially pretty at the moment, but it’s nothing you can’t fix. Just fluff it up with your fingers.
Grab your craft scissors and trim the pompom down to a prettier, rounder, more even shape. I find if I trim closer to the core, the yarn pompom looks thicker and more professional.
Last, pull the ends of your pompom through the top of your beanie. Tie a knot to secure the pompom to your hat. Trim the ends as needed, and tuck away any loose yarn into the rest of your hat.
Voila! You’ve just finished your Fair Isle beanie with a pompom. It’s beautiful, isn’t it?
Need Some Extra Help?
I still consider myself a beginner at loom knitting, so I try to share easy projects that I can teach to others. But, I know that what looks right to me doesn’t always make sense to everyone else. If my loom knitting pattern seems confusing, please feel free to ask me any questions about my pattern. I check my comments and emails frequently, so I try to get back as quickly as I can.
I hope you love your Fair Isle beanie!